Sunday 6 November 2016

SoapUI : Get/Set property Value from groovy

Get/Set property Value of a Project from script

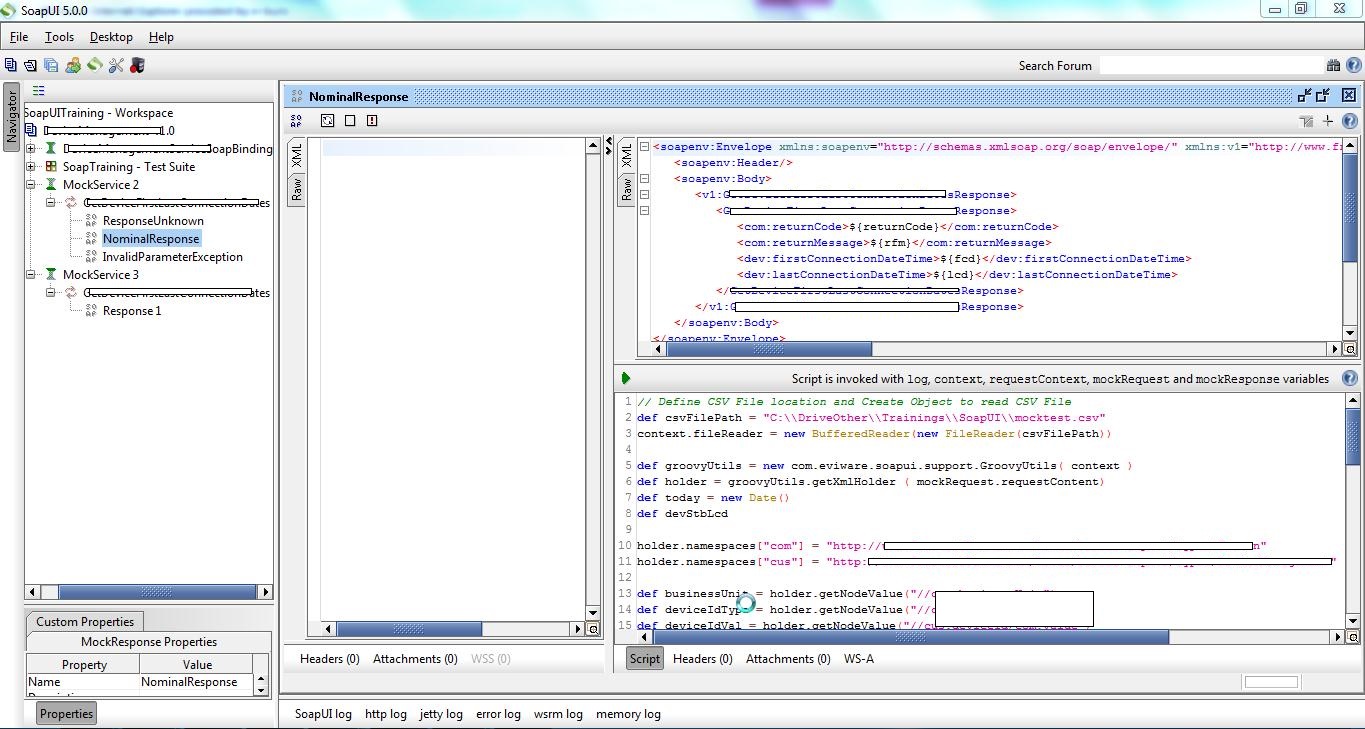
To be able to get a property value of a Project  from the mock Service within the same project, you can use the below command under the Script of your mockService
def varProperty = mockResponse.mockOperation.mockService.project.getPropertyValue("someProjectProperty")
And from a groovy script test step you can use
def testCaseProperty = testRunner.testCase.getPropertyValue( "MyProp" )
def testSuiteProperty = testRunner.testCase.testSuite.getPropertyValue( "MyProp" )
def projectProperty = testRunner.testCase.testSuite.project.getPropertyValue( "MyProp" )
def globalProperty = com.eviware.soapui.SoapUI.globalProperties.getPropertyValue( "MyProp" )
To be able to set the same property with a different value using command you can use the below command
mockResponse.mockOperation.mockService.project.setPropertyValue("someProjectProperty", "NewValue")
And from a groovy script test step you can use
testRunner.testCase.setPropertyValue("MyProp", "NewVal")
testRunner.testCase.testSuite.setPropertyValue("MyProp", "NewVal")
testRunner.testCase.testSuite.project.setPropertyValue("MyProp", "NewVal")
com.eviware.soapui.SoapUI.globalProperties.setPropertyValue( "MyProp", someValue )

To get/set values from the assertion script, you can use the below code in your assertion script. This kind of approach may help you with property transfer.
messageExchange.modelItem.testStep.testCase.setPropertyValue("MyProp", "NewVal")
messageExchange.modelItem.testStep.testCase.testSuite.setPropertyValue("MyProp", "NewVal")
messageExchange.modelItem.testStep.testCase.testSuite.project.setPropertyValue("MyProp", "NewVal")

You can repace the hard values with another variable to be able to optimize your code.

SoapUI : Fetching path of the project file

In order to fetch the current path of the project you can use the "projectPath" function of GroovyUtils. This example can be useful when you have to refer files which will be located within project however you do not want to perform modification every time you move them to another location on the same server or another server.
def groovyUtils = new com.eviware.soapui.support.GroovyUtils( context )
def projectDir = groovyUtils.projectPath
def csvFilePath = projectDir + testRunner.testCase.testSuite.getPropertyValue( "externalFile" )
log.info "File : " + csvFilePath

SoapUI : Externalizing target URL and TestSuite custom parameters

SoapUI's best strength is "groovy" which is almost always there to save you from specific project requirements. We had this requirement to externalize target URL of a test step and test suit, and agin groovy was there to save our day.
  • You must accept that you cannot externalize everything, there will always be something that you will have to hardcode. So, we started with hardcoding the path of an external file using TestSuite's custom properties.
  • Add a groovy test step under the test case you want to achieve this functionality.

In case you prefer to update the target URL/end point of the test steps withing TestSuit's setup script then you'll have to modify the script a little bit to be able to fetch the test step name.

Soap Request Schema Validation : mock Services

Below script can be placed under "OnRequest Script" of a mock service to automatically validate the XML Schema compliance to the corresponding incoming request.
The script validates the incoming request and incase the request does not comply to the Schema of the WSDL then an automated fault message is sent by the mock service on behalf of the incoming request. Implementation of this script can help us overcome the situation where we have to manually validate the request sent by application to the mock service to make sure it complies to the schema structure of the WSDL.


SoapUI : Start/Stop of mock services

When you are testing an application which has various interfaces with different application, you will need many mocks to execute your unit tests. With multiple mocks it is also difficult to manage them. Think of a scenario where the application has interface with 20 or perhaps even more application/web services, and in such cases that many number of mock services. In these kind of scenarios starting and stopping all the mocks is a time taking activity. 

So, why shouldn't we automate them :)

Starting mock service

Below groovy script will help you start all the mock services in the current workspace and minimize them all.


Stopping mock service

Below groovy script will stop all the open mock services and close all the open windows under the current soapUI workspace.
 
When your project needs to target to a platform which is accessible only from a proxy, you may have to do it within SoapUI. However, when you are running your project files from a different machine, it might not be feasible to do the same . You can achieve it by putting the below script

SoapUI : set proxy from script

When your project needs to target to a platform which is accessible only from a proxy, you may have to do it within SoapUI. However, when you are running your project files from a different machine, it might not be feasible to do the same . You can achieve it by putting the below script

SoapUI Mocks : Automated response from CSV files

When you have hundreds of responses for an operation within a mockService it can be very difficult to search and modify them. This dificulty increases with the number of people who are working on the same project at the same time trying to edit these responses. Having the responses in an easy editable CSV file is much convinient. To achieve this goal we have found a solution which has been described below : 

Step 1 : Update Mock Service

Update the mockService to validate the incoming request for conformity of the request. You can refer to topic "Soap Request Schema Validation : mock Services" to achieve this level.

Step 2 : Update Operation

Open the operation under mockService and put the script below under 


Here below is full script from the above screen


The above script search for the requested data in the CSV file, if the data is found and value for "returnCode" column is "0" in the CSV file then it returns the "NominalResponse" otherwise returns the response which is mentioned in the place of returnCode under the CSV file. If both these case are failed then it returns "ResponseUnknown". 

Step 3 : Update the Response

The next step is to update the nominal response and parameterize the values with the actual results from the CSV file. Here a new search is made to the CSV file and corresponding data is fetched. Since we already know that the data exist in the CSV file hence no alternate is given, however you are free to improve this script as per your need.


Put the below script (need to udpated for each webservice and each operation) in the "Script" tab of the "NominalResponse". This script fetch the corresponding data from the CSV file and put it in place of the context variables which are used in the response.


The above script has to be made common for all the common responses, if any special case response  is required then add the special case in the CSV file and in the response list and update the scripts according to your needs.

SoapUI : Websphere MQ Test Integration

Prerequisites : 

  • MQ Queue should be accessible from outside
  • Details of Queue manager (IP, port, etc)
  • IBM Websphere MQ client installed on the machine

Configuring HermesJMS

The new version of SoapUI comes in a bundle with HermesJMS which can be installed while installing SoapUI itself. If you do not have HermesJMS installed already, you can do it after downloading it from the open source website here or here. Go to SoapUI preferences and make sure you have the home location of HermesJMS in the tools section


To launch it right click on the project in the current workspace and select "Start HermesJMS" or choose the same from Project menu(SoapUI 5.0 onward). While starting the HermesJMS you will be asked to give location of configuration file for starting HermesJMS which would be by default in the user home (something like : C:\Users\<user name>\.hermes). 


Once HermesJMS is started follow the below instructions in order to be able to connect to MQ queue
  • Go to "Options => Configuration"
  • Go to the "Providers" tab on the window and add a new group named "Websphere MQ" and add MQ related jar files as visible in the screen shot from the location <MQ Client install path>/java/lib/
  • Click on "Apply" and "OK" to save the configuration


Once the configuration is done, you can start preparing for your connection
  • Right click on "Session" from the left hand side panel and click on "New => New Session"
  • On the configuration window, check if you have the MQ jar files already added on the group.
  • Now come back to the "Sessions" tab and select "Websphere MQ" (or the name you chose for your group) from the Loader under "Connection Factory"
  • Select "com.ibm.mq.jms.MQQueueConnectionFactory" for the "Class" under "Connection Factory"
  • Now Select "IBM WebsphereMQ" as plug in. Make sure you do it after defining the loader under connection factory otherwise you will end up having an error.
  • Right click under the "Connection Factory" to add properties and add below properties
    • hostName=IP of the MQ server
    • channel= channel used for connection (in this case : SYSTEM.ADMIN.SVRCONN)
    • port=listener port of the queue manager (e.g 1441)
    • queueManager= Queue Manager's name (e.g. QMGR1)
    • transportType=1 (for client mode)
  • Update the name of the session as per your test need, once done, click on "Apply" and "OK".
  • You do not need to put any value or change anything in the "Destinations", it will be populated automatically from the queue manager in the next step


You will now see a new session in the left panel under "Sessions".
  • Right click on the new session that you have created and click on "Discover".
  • A popup will appear asking if you want to replace current set of destinations, hit "Yes" and you will have all your queues in the list as in screen shot below
 

Creating Soap Test Case with MQ Connection

To be able to make a MQ test with SoapUI, you need to have your MQ sessions ready with HermesJMS as described in step above. The MQ connection needs to have good memory settings done otherwise it will eventually run out of memory and SoapUI may stop functioning properly.

Setting SoapUI Memory Configuration

  • Make sure all SoapUI sessions are closed.
  • Go to the bin directory under SoapUI installation location. For example : C:\Program Files\SmartBear\SoapUI-5.0.0\bin
  • Edit file "soapui.bat" and change the entry for JAVA_OPTS and upgrade the memory settings as shown in the screen below
  • Save the file and close it.
  • Start SoapUI, it will be using the new memory settings.

How to add MQ Test

  • Step 1 :
    • Open or create a new SoapUI project.
    • Right click on available interface from the project and choose "Add JMS Endpoint". It will open the below popup dialog
  • Step 2 :
    • Set the correct hermesJMS configuration file (hermes-config.xml) then select configured MQ session as per your configuration.
    • Select a destination queue name from "Send/Publish destination" to where you want to inject MQ message
    • Select a source queue name in "Receive/Subscribe destination" from where you want to receive your acknowledgment message.
    • Note : You can keep either of the drop down lists empty as per your specific use case. For example
      • Select queue name only in "Send/Publish destination", if it is send only JMS connection
      • Select queue name only in "Receive/Subscribe destination" if it is receive only JMS
      • Select both queue names if you have send and receive queue both available in same queue manager and the response in synchronous response
  • Step 3: Inject order
    • Create a new Soap Request and remove the default content of the request.
    • Right click on request content area and select "Load From (Ctrl + L)" and choose the request XML file to be injected in MQ Queue. Or, Copy-paste the content to the request from original xml request. 
    • Select the JMS end point as per your test need.  Example : jms://QMGR1::queue_INQUEUE
    • Run the test to inject order 
  • Step 4: Receive order 
    • Create a new Soap Request and remove the default content of the request.
    • Remove the content of the request
    • Select the JMS end point for retrieval. Example : jms://QMGR2::-::queue_OUTQUEUE
    • Run the test to read the message. 
  • Step 5:
    • Receiving an order will wait for the message to be read. If there is no message then it will continue to wait
    • To avoid such a situation, we can always put a timeout from the TestRequest properties
    • Set timeout in miliseconds to the test request from "Timeout" property.


For more information about using JMS with SoapUI, you can refer to the links below
  • https://www.soapui.org/jms/getting-started.html
  • https://www.soapui.org/documentation/jms/config.html
  • https://www.soapui.org/jms/working-with-jms-messages.html
  • https://www.soapui.org/jms/validating-jms-responses.html

Saturday 5 November 2016

SoapUI Tests : Integration with QC/ALM

The article aims to explain the steps needed to integrate your SoapUI tests with HP quality center/ALM.

Prerequisites 
  •  SoapUI 2.0.2 version or above installed
  • Access to Quality Center envelope where the tests are to be integrated.

Principle of the solution

  • The solution interface presented here is based on the performance of existing SoapUI tests.
  • SOAPUI scripts are launched from the VAPI-XP scripts of the automated test under Quality Center
  • VAPI-XP tests retrieve the status of the SOAP-UI tests and returns to PASSED or FAILED state in Quality Center.
  • SopaUI test must have a assertion available to be able to determine the passed or failed status.
  • SoapUI project saved as an XML file on your system.

Creation of the Script VAPI-XP

In the TestPlan view, create a test of type VAPI-XP-Test in the corresponding directory.


On the "New Test" window, select "VAPI-XP-TEST" from the template type, update the name of the test and click on OK.


Select the script language of the test (VBScript) and name of the script, then click Next.
 

Select the type of test (Console Application Test), then click Next.


Click on "Finish" in the next step


Select the "Test Script" tab on the test. 


Replace the code generated by the Quality Center with the one given below.